A clean Firebird can still hide the kind of metal damage that turns a weekend dream into a garage sentence. Pontiac Firebird rust usually starts in places you do not admire at a car show: lower fenders, cowl seams, rear quarter drops, trunk corners, rockers, floors, and frame rail areas. That is why your first inspection should happen with a flashlight, magnet, pick, and enough patience to distrust fresh paint. For restoration owners in the USA, the danger is not age alone. It is moisture trapped by vinyl tops, road salt, old seam sealer, clogged drains, wet carpet, and decades of patchwork repairs. A car from Arizona can have a rotten rear window channel. A Midwest survivor can look honest until the seats come out. Before you price paint, wheels, or interior trim, treat the body shell as the budget. Good restoration planning resources help, but the metal still tells the truth. If you are buying, saving, or tearing down a classic Firebird restoration, inspect the hidden structure first, then decide how pretty the car deserves to become.
Start With the Shell, Not the Shiny Panels
Most restoration mistakes begin with emotion. The car sits right, the nose looks mean, the seller has a folder of receipts, and you start picturing the finished build before you crawl under it. Slow down. Firebird corrosion can make a straight car act like a crooked one because the sheet metal, subframe mounts, rockers, floors, and rear structure all work together. A beautiful door gap does not prove the body is solid. It may only prove someone adjusted the hinges after the damage began.
Check lower fenders, door bottoms, and rocker edges before paint fools you
Lower front fenders deserve your first look because they catch dirt, leaves, water, and road grit behind the wheel. On first- and second-generation cars, that pocket can sit wet long after the rest of the body dries. Owners on Firebird forums often point to the lower fenders, rear quarters, trunk, lower doors, floor panels, and pinch welds as common inspection areas, which matches what many body shops find once trim and splash shields come off.
Do not stop at the outside skin. Open the door and inspect the lower seam from end to end. Look for swelling, blistered paint, crunchy seam sealer, and drain holes packed with debris. A door can look fine from ten feet away and still have the lower lip separating inside the fold. Tap the area with your knuckle. A dull, thick sound can mean filler. A sharp, tinny sound is not proof of clean metal, but it is a better start.
Rocker panels need a colder eye. They are not decoration. They help tie the front and rear of the body together, especially on cars that have lived through hard launches, worn body mounts, or old collision work. Remove sill plates where possible. Some Trans Am owner references call out rocker rail corrosion near sill plate and wiring cover areas, where trapped moisture and dissimilar metals can speed up decay. That sounds small until you realize the rocker is the spine under your feet.
Read gaps and seams like a body man, not a buyer
Panel gaps tell stories, but they lie when read alone. A door that sticks at the back edge may point to hinge wear. It may also hint at weak rockers or sag in the body shell. A fender-to-door gap that widens near the bottom can mean previous repairs did not land square. A quarter panel that looks smooth but has a soft wheel opening lip may hide a patched outer skin over a rotten inner structure.
Bring a small inspection mirror and look behind lips, braces, and pinch welds. Fresh undercoating should not comfort you. It often hides sins. The non-obvious move is to inspect the ugly factory seams before you inspect the glossy panels. Factory spot welds, seam sealer lines, and drain openings are harder to fake well. A patched panel can look slick; a factory seam that turns wavy tells on it.
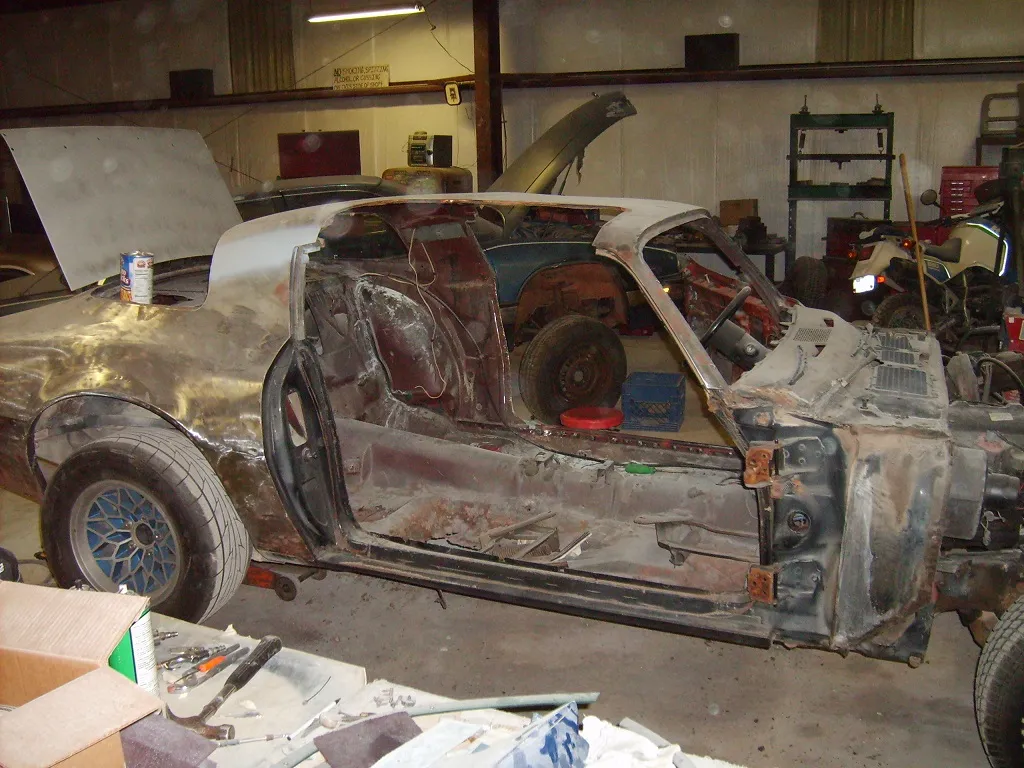
A real-world example: a 1978 Trans Am from the Rust Belt may show decent black paint, tidy seats, and shiny Rally II wheels, then fail the rocker and floor inspection once the sill trim comes off. That does not make the car worthless. It means your restoration budget moved from cosmetics to metal surgery. Before you buy parts, read a classic car inspection checklist and build your plan around structure, not wishful thinking.
Pontiac Firebird Rust in Floors, Cowl Areas, and Frame Mounts
The top side of the car gets the applause. The underside sends the bill. Floors, cowl corners, toe boards, body mounts, and front subframe attachment points decide whether the project feels steady or fights you through every stage. This is where F-body rust becomes more than a cosmetic problem. Once water gets past windshield seals, heater boxes, kick panels, or wet carpet, it sits in low pockets and works from the inside out.
Pull carpet when floor pans and toe boards feel suspect
Carpet hides the most expensive kind of denial. You can poke from underneath and still miss the damage that starts above the floor pan. Old jute padding acts like a sponge. Once it gets soaked, it can hold moisture against the floor for years. The driver side often suffers from wet shoes and leaking seals. The passenger side can rust from heater core leaks, windshield leaks, or cowl water that finds a path down the kick panel.
Inspect the seat mount areas, floor braces, toe boards, and the seam where the floor climbs toward the firewall. Use a pick with restraint. You are not trying to destroy the car; you are trying to find the weak truth before it finds you. If the tool sinks, flakes, or opens a seam, the repair will need more than converter and paint.
Replacement floor and trunk panels exist for many 1967–1981 Firebirds, and major parts suppliers list full pans, braces, plugs, and related repair pieces for these years. That is good news, but it can also trap you. Parts availability does not make the job small. Cutting floors means bracing the body, protecting alignment, and welding with care around old metal that may be thinner than it looks.
Inspect cowl corners and subframe mounts before teardown gets expensive
The cowl area is sneaky because it can look fine until water testing or disassembly exposes the path. Check the lower windshield corners, dash top near the A-pillars, kick panel areas, and the seam where the firewall, cowl, and floor come together. A Firebird that smells musty inside deserves suspicion. A car with foggy glass after sitting outdoors deserves more.
Now move to the subframe mounts. Second-generation Firebirds use a front subframe tied to the body at key mounting points. If the mount areas rot, the car can lose alignment integrity and become harder to square during repair. Look for crushed bushings, distorted holes, stacked washers, torn metal, or repairs that look like someone welded a plate over a problem rather than rebuilding the mount.
The counterintuitive point is simple: a small cowl leak can become a structural repair. Water enters high, travels low, then attacks floors, toe boards, and mounts. Many owners chase the wet carpet first. Better move? Chase the water path. Pour testing, compressed air through drains, and trim removal can save you from replacing a floor only to soak the new metal again next winter.
Rear Quarters, Trunk Drops, and Tail Panels Hide the Costliest Surprises
Once the front shell checks out, go straight to the rear. Firebird corrosion in the back half often hides behind the parts people love most: spoilers, trim, rear glass, quarter skins, and fresh trunk spatter paint. The rear of these cars traps moisture in layers. Outer quarter panels, inner wheelhouses, trunk drops, tail panels, rear frame rails, and bumper brackets can all rot together. One rusty corner often means a chain of repairs.
Probe wheel lips, quarter drops, and rear window channels
Rear wheel lips get blasted by road grit from inside and weather from outside. That makes them prime rust zones. On 1970–1981 Firebirds, body panel guides and restoration references often call out rust behind the rear wheels, especially where the lower quarter meets the trunk extension. That joint matters because it is not a flat patch. It is a layered corner where the outer panel, drop-off, and inner structure meet.
Run your hand under the wheel opening lip. Feel for thick filler, jagged metal, or a lip that changes shape as you move around the arch. Look inside the trunk at the same area. If the outside looks smooth but the trunk drop is gone, someone may have repaired the visible skin and ignored the part that supports it. That kind of shortcut comes back later as cracks, moisture, and poor panel fit.
Rear window channels need equal respect. Vinyl-top cars and cars parked under trees often rust around the lower rear glass corners. The paint may bubble near the trim, but the damage can run under the molding. Remove trim if the seller allows it. If not, inspect with extra doubt. Water entering the rear glass channel can feed trunk floor rust, quarter decay, and package tray damage.
Check the trunk floor, spare tire well, and rear rails as one system
Open the trunk and look past the mat. Trunk spatter paint can hide pitting. Undercoating can hide patches. The spare tire well often rusts because water settles there after seal leaks. Check the lower corners near the tail panel, the fuel tank brace area, and the seams above the rear rails. A clean trunk floor with rotten lower quarters may mean the repair stopped where the buyer could see.
Rear frame rails are the line between a normal metal job and a hard decision. Tap them lightly. Look around spring pocket areas, bumper mount points, and any place dirt can sit on top of a horizontal surface. If you find swelling seams or holes near suspension load points, do not treat it like a cosmetic patch. That area carries force.
Here is the non-obvious insight: trunk rust can be a water-leak clue, not only a metal problem. Before welding in a new trunk pan, test the decklid seal, rear glass channel, tail light gaskets, side marker openings, and quarter seam areas. A perfect new pan under a leaking rear window is a future repair waiting for your patience to run out.
Matching Damage to the Right Restoration Decision
After the inspection, the hard part begins. You have to decide what the car deserves. Not every rusty Firebird needs a full rotisserie build. Not every clean-looking driver deserves quick paint. The right path depends on structure, originality, trim level, budget, skill, and your end goal. A rare Trans Am or numbers-matching early car can justify deeper metal work than a rough base coupe with missing parts. That may sound harsh. It is how good projects survive.
Separate cosmetic rust from structural rot before pricing the build
Surface rust on a removable fender is annoying. Rot around a subframe mount changes the math. Rust in a trunk drop is repairable. Rust spreading into rear rails, spring pockets, and tail panel seams raises the skill level. Build three lists: panels you can unbolt, panels you can patch, and structure that must return to factory strength. That last list controls the budget.
Do not price the job from online panels alone. Add bracing, welding supplies, seam sealer, epoxy primer, blasting, alignment time, glass removal, trim clips, weatherstripping, and reassembly. A cheap panel can become costly once the old metal fights back. This is where a muscle car restoration budget guide can keep the plan honest.
A mild example would be a 1969 coupe with rotten lower fenders, one soft floor patch, and a small trunk repair. That car may suit a careful driver restoration. A tougher example is a 1976 Trans Am with rear rail rot, bad rockers, roof channel rust, and patched quarters. That car may still be saved, but only if the budget matches the ambition.
Use inspection findings to choose repair order, not wish lists
Repair order matters. Start with structure and water paths. Then move to panels. Then bodywork. Then paint. Owners often want to hang new quarters before solving the trunk, wheelhouse, and drop-off damage underneath. That creates clean-looking work on a weak foundation.
Document everything with photos before cutting. Measure door openings, trunk gaps, wheelbase points, and subframe alignment marks. Brace the shell when floors, rockers, or large quarter sections come out. Test-fit panels more than once. A Firebird is forgiving in spirit, not in sheet metal alignment.
Before road use, search the car’s VIN through the official NHTSA recall lookup and inspect safety systems with the same seriousness you give the body. Older cars often carry changes from past owners, so brakes, steering, fuel lines, and suspension mounts deserve attention before the first long drive. That is not glamorous, but neither is losing trust in a car you spent years saving.
Conclusion
Rust inspection is not the gloomy part of owning an old Firebird. It is the part that protects the dream from bad math. Paint, trim, decals, and wheels can wait because none of them fix a weak shell. The smartest restoration owners inspect from the dirty zones inward: rockers, floors, cowl corners, frame mounts, rear quarters, trunk drops, rails, and glass channels. Pontiac Firebird rust can look like a small bubble from the outside while the real damage sits two layers deep. That does not mean you should fear every project car. It means you should respect the order of work. Find the water path. Confirm the structure. Price the metal before the cosmetics. Then decide whether you are building a driver, a show car, or a long-term family keeper. A Firebird with honest metal work feels different on the road because you know what sits under the shine. Inspect first, buy slower, and restore the car in a way your future self will thank you for.
Frequently Asked Questions
What are the first rust spots to check on a Pontiac Firebird?
Start with lower front fenders, rocker panels, floor pans, toe boards, rear quarter lips, trunk drops, rear frame rails, and window channels. These areas trap moisture and often hide damage behind trim, carpet, undercoating, or old body filler.
Is floor pan rust a deal breaker on a classic Firebird?
Small floor repairs are common and often manageable. Large rust near seat mounts, braces, toe boards, or subframe mount areas is more serious. The repair must restore strength, not only cover holes with new metal.
How can I tell if a Firebird has hidden body filler?
Use a magnet, inspect panel edges, tap lightly, and look from behind the panel when possible. Thick filler often shows near wheel lips, lower quarters, door bottoms, and fender bottoms. Uneven seams and blocked drain holes are warning signs.
Are rear quarter panels hard to repair on a Firebird?
They can be hard because the visible quarter connects to inner wheelhouses, trunk drops, rear seams, and window channels. A skin repair may look good at first, but hidden rust behind it can return if the inner structure stays weak.
Should I remove the carpet before buying a restoration project?
Ask for it when the car has a musty smell, wet floors, soft spots, or visible underside patches. Sellers may refuse, but that tells you to price the risk. Carpet can hide floor rust for years.
What tools should I bring to inspect Firebird corrosion?
Bring a flashlight, inspection mirror, small magnet, gloves, phone camera, pick, and a notepad. A floor jack helps only if used safely with stands. Never crawl under a car supported by a jack alone.
Can a rusty Firebird still be worth restoring?
Yes, if the car has strong value, rare options, personal meaning, or solid parts that justify the repair cost. A common model with major structural rot may cost more to save than buying a better shell.
What is the best way to stop rust after repairs?
Cut out weak metal, weld in sound steel, seal seams, use epoxy primer, protect cavities, clear drains, and fix leaks. Rust returns when water paths stay open, even after neat welding and fresh paint.