A rear wheel that will not turn can make a simple weekend brake job feel personal. A seized brake drum usually comes from rust, shoe drag, hardware failure, or a worn ridge inside the drum that traps the shoes. The right fix is not brute force first. It is a calm check of what is holding the part, then a safe release, then a decision about cleaning, adjusting, or replacing. Many American drivers meet this problem after a car sits through a damp winter, parks near road salt, or spends months outside with the parking brake set. If you are comparing repair advice from local shops, trusted vehicle maintenance resources can help you separate a careful diagnosis from a guess. The short answer: secure the car, back off the adjuster, release the parking brake, manage rust at the hub, and replace any drum that is cracked, scored, bell-mouthed, or beyond its service limit.
Seized Brake Drum Causes Drivers Should Know Before Forcing It
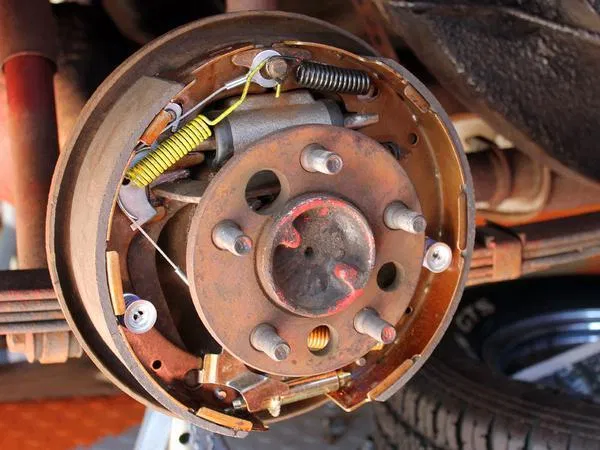
A stuck rear drum rarely has one single villain. The tension usually builds over time, then shows up all at once when you try to pull the drum by hand. That is why a hammer-only approach can turn a fixable brake job into bent backing plates, broken hold-down pins, and a new noise you did not have before.
Rust at the hub can lock the drum like a second fastener
The most common driveway version is rust between the center bore of the drum and the wheel hub. It does not need to look dramatic. A thin orange crust can grip the metal faces enough that the drum feels welded in place, mainly on cars that live in the Midwest, Northeast, or mountain states where salt stays on roads after snow.
Here is the odd part: a car can brake fine and still have the drum frozen to the hub. That means the brake shoes may not be the problem at all. The drum is stuck on the outside face, not clamped from the inside. This is why tapping around the hat area, not the thin outer edge, often works better. You are trying to shock the rust bond, not punish the drum.
A specific example helps. A ten-year-old compact sedan in Ohio may come in for rear shoes after a long winter. The wheel comes off, the drum will not move, and the owner assumes the shoes are jammed. After the adjuster backs off, nothing changes. A few hits around the hub face, a soak at the center bore, and two threaded removal bolts can pop it loose. The brake parts inside may still be ordinary worn parts, not a disaster.
Shoe drag, parking brake tension, and worn ridges trap the drum from inside
The second common cause sits inside the drum. Brake shoes expand outward when you stop, then springs pull them back. If return springs weaken, the parking brake cable sticks, or the star wheel adjuster overextends, the shoes stay too far out. Now the drum has to slide over material that refuses to shrink away.
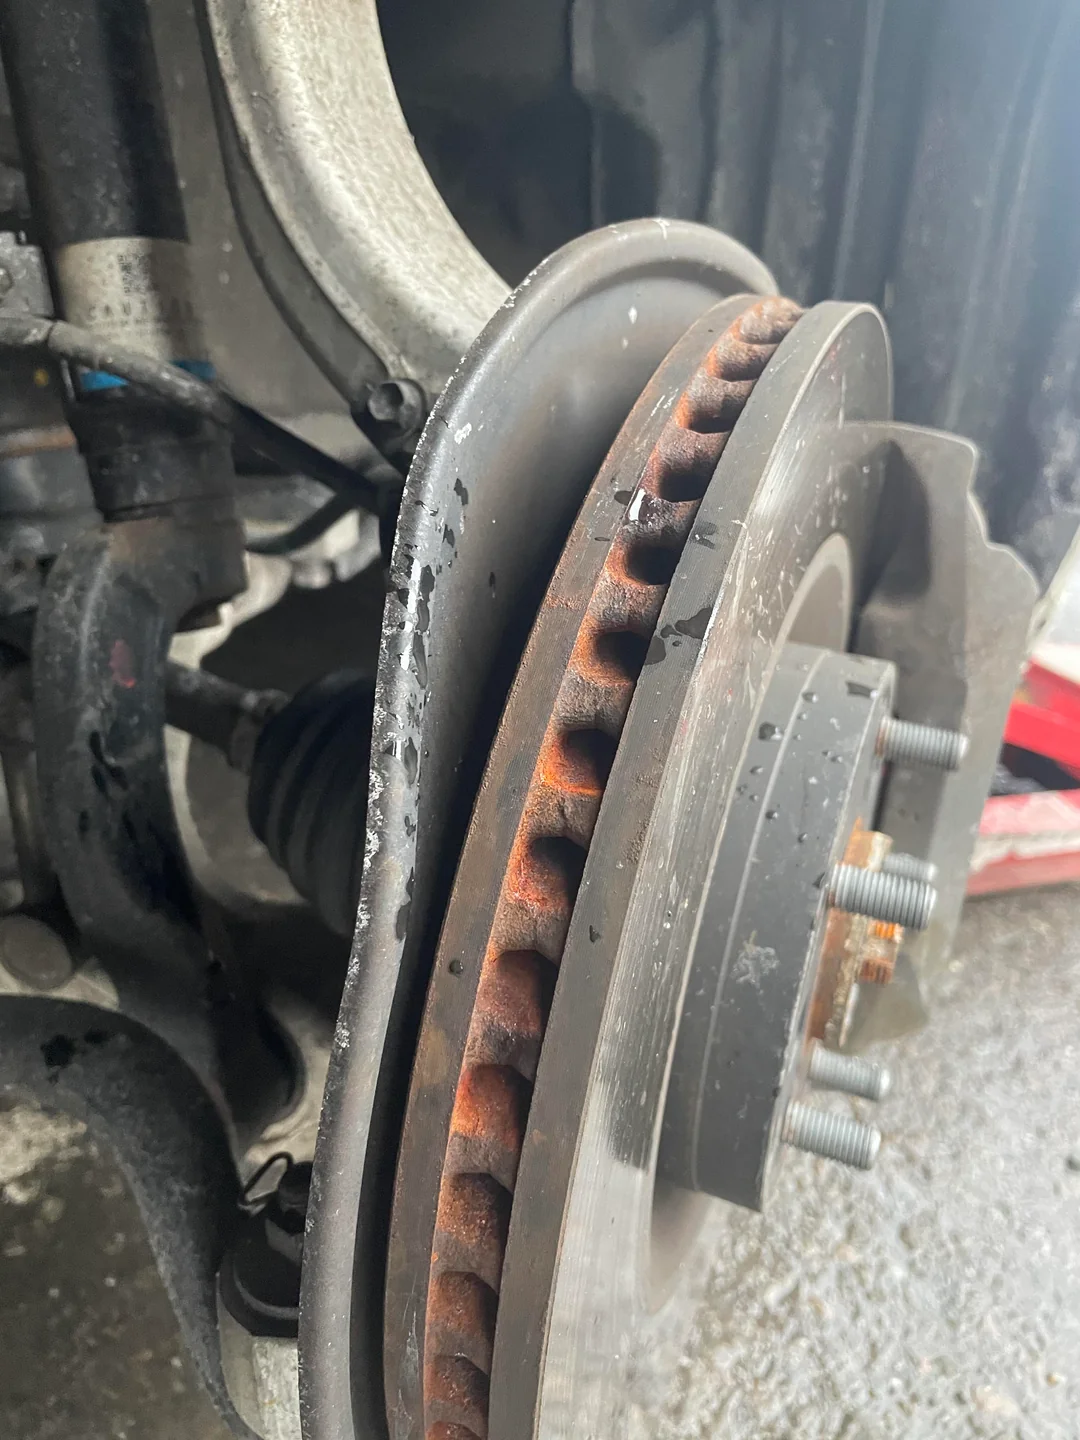
A worn drum adds another trap. Over miles, the shoes sweep the braking surface and may leave a ridge at the outer lip. That ridge can catch the shoe lining during removal. This is the stuck brake drum that rotates a little but refuses to slide off. It feels stubborn in a different way than a rusted hub. It fights at the last quarter inch.
Do not overlook the parking brake. Many rear drum systems also carry the parking brake inside the same hardware. If the handle or pedal is released but the cable is corroded, the shoes can stay partly applied. A driver in Chicago may park outside, set the brake during a wet freeze, then hear a pop the next morning when the car finally moves. That sound is not a victory. It can be lining pulling loose or hardware shifting under stress.
There is also a quieter failure that fools careful owners. A car may roll, stop, and pass a quick pedal test, yet one shoe may be dragging enough to heat the drum on a longer drive. Heat dries lubricant, weakens spring action, and bakes dust into the adjuster threads. The first symptom may not be a warning light. It may be a hot smell after a short trip to the grocery store.
Safe Brake Drum Removal Without Turning a Repair Into Damage
Once you know the two main lock points, the job becomes less emotional. You are not fighting the car. You are finding the grip point and removing it in order. Safe brake drum removal starts before the first hammer tap because rear brake work punishes shortcuts fast.
Set the car up so the wheel can move and the drum can release
Park on flat ground, chock the front wheels, loosen the lug nuts slightly, then lift the car at the correct jacking point. Support it with jack stands. Never crawl or reach under a vehicle held only by a jack. Keep the transmission in park or in gear as the situation requires, but make sure the parking brake is off when you are working on rear drums.
That last detail catches people. The habit of setting the parking brake while parked is good on the street, yet it works against you during rear service. On many cars, it locks the same shoes you need to retract. If the rear wheels are off the ground and one side will not rotate, compare it with the other side. A frozen cable may show itself before you even touch the drum.
Remove any small retaining clips on the wheel studs if the vehicle has them. These clips hold the drum during assembly at the factory, and they may get overlooked. They are often thin, rusty, and easy to mistake for junk stuck around the studs. Cut them off if they are not meant for reuse. Then clean the center bore area with a wire brush and apply penetrating oil where the drum meets the hub, keeping oil away from friction surfaces.
One more step saves grief on trucks and older cars: identify what type of drum you have before pulling. Some light-duty setups slide over the studs. Other designs are tied into the hub or bearing arrangement. If the service manual shows a hub assembly, forcing the part like a simple slip-on drum can damage bearings or seals. The shape looks familiar, but the job is different.
Back off the adjuster before you swing harder
Most drum systems have an access slot on the backing plate or drum face. Behind it sits a star wheel adjuster. Turning it the correct direction retracts the shoes, though the direction varies by design and side. If the drum spins but will not slide off, this step matters more than force. You may need a brake spoon or a small flat screwdriver and a flashlight.
This is where patience saves money. The adjuster may fight because dust, rust, and age pack around the threads. Work slowly. If the star wheel has a lock lever, you may need to lift that lever while turning. A stuck brake drum that hangs on the shoe ridge can often release after several small clicks. One big hit will not solve a mechanical catch inside the drum.
Use a dead-blow hammer or a regular hammer with care. Strike the thick face around the hub, then rotate the drum and repeat. Do not hammer the backing plate. Do not pry hard against the dust shield or wheel cylinder area. If the drum has threaded removal holes, use the correct bolts and tighten each side evenly. When the drum starts to move, keep pulling straight. Rocking it too much can bend hardware that was still worth saving.
If the drum moves outward and then snaps back, stop and rethink the catch point. That usually means the shoes are still hooked behind the wear ridge or parking brake lever. More force can tear the linings or pull springs loose. Back the adjuster off again, rotate the drum a few degrees, and try a straighter pull. Slow work here feels dull, but it keeps the backing plate square.
When to Clean, Replace, or Rebuild the Rear Brake Parts
Getting the drum off feels like the finish line, but it is only the point where the real inspection starts. A freed drum can still be unsafe to reuse. The counterintuitive truth is that the part that fought you hardest is not always the part that needs replacement. Sometimes the quiet spring, cable, or wheel cylinder caused the whole mess.
Inspect the drum surface before you decide it earned another chance
Look inside the drum with good light. A smooth, even surface with light wear may be serviceable if it measures within spec. Deep grooves, heat cracks, heavy scoring, blue heat marks, or an uneven bell shape point toward replacement. The maximum inside diameter should be cast or stamped on many drums. If it is not readable, check the service manual for that vehicle.
A machine shop can turn some drums, but replacement often makes more sense for common American daily drivers. Labor, age, and thinner metal change the math. If the drum already sat near its limit, machining can leave too little material. Thinner drums can run hotter and may become more prone to noise. Cheap parts are not the goal; predictable braking is.
Before buying parts, check for open safety recalls through the NHTSA recall lookup, mainly if your complaint includes brake warning lights, hydraulic issues, or a known model pattern. Recalls will not cover every worn drum or stuck cable, but the check costs nothing and can reveal a repair path you should know before spending your own money.
Measurement matters because eyes lie. A drum can look clean and still be out of round. It can also have a polished surface that feels smooth but causes chatter once warm. If you do not own a drum micrometer, a shop can measure it. That small check is cheaper than installing new shoes against a drum that ruins them in a month.
Replace shoes and hardware when age has already made the choice
Brake shoe replacement is not only about lining thickness. Shoes can crack, glaze, wear unevenly, or separate from the metal table. If the lining has been soaked by brake fluid or gear oil, replace it. Cleaning oil out of friction material is false economy. It may look dry later and still grab, fade, or pull to one side.
Hardware deserves the same respect. Springs lose tension after heat cycles. Hold-down pins corrode. Star wheel threads seize. Parking brake levers stick. A rear drum system depends on all of these small pieces moving in a set pattern. One weak spring can leave a shoe dragging enough to heat the drum, wear the lining, and bring the same problem back.
Replace both sides of an axle as a set. If the left rear needs shoes, the right rear should match. If one drum is replaced due to damage, compare the opposite side with care. Uneven rear braking can feel small during normal stops, then show up under rain, panic braking, or a loaded trunk. For deeper related coverage, link this job to your early brake warning signs guide and your rear brake service checklist so readers can move from symptoms to repair planning.
The wheel cylinder is the part many DIY repairs miss. It sits high on the backing plate, half-hidden by springs and shoes, and it may leak only when pressure rises. Peel the dust boot back with care. Fluid there means the cylinder has failed. Replacing shoes while leaving a wet cylinder behind is a repair that has already started to fail.
Reassembly, Adjustment, and Prevention After the Drum Comes Off
The job can still go wrong after the old parts are on the floor. Rear drum brakes look simple, but the spring layout, adjuster direction, and parking brake lever position must match the design. Take pictures before disassembly. Better yet, work one side at a time so the other side stays assembled as a reference.
Build the brake assembly clean, dry, and in the correct order
Use brake cleaner in a well-ventilated area and catch runoff safely. Avoid blowing brake dust with compressed air. Older vehicles and unknown replacement parts deserve extra caution around dust. Clean the backing plate pads where the shoes rub, then apply a small amount of proper brake lubricant only at those contact points. Keep grease off the shoe lining and drum surface.
Match the new shoes to the old layout. Some systems use a primary and secondary shoe with different lining lengths. Mixing them can cause poor stopping, grabby action, or weak parking brake hold. Install springs with the right tools so they seat fully. A half-seated spring can look fine until the first drive, when it shifts and makes a scrape that sends you back under the car.
Brake shoe replacement should end with a careful wheel cylinder check. Pull the rubber boots back slightly. Any wetness inside means the cylinder is leaking and should be replaced. A dry boot is not a guarantee, but it is a useful sign. If the pedal felt soft before the job, or the fluid level had been dropping, do not ignore the hydraulic side while staring at the mechanical parts.
Keep the old parts arranged on the ground in the same pattern they held on the backing plate. This low-tech habit prevents reversed springs and misplaced levers. Many drum brake mistakes happen because two parts look close enough until the adjuster no longer works. The photo helps, but the physical layout beside you helps more when your hands are dirty.
Adjust the shoes so the pedal feels right without dragging the wheel
Initial adjustment matters. If the shoes sit too far in, the pedal can feel low and the parking brake may need too much travel. If they sit too far out, the drum overheats and the car may feel held back. The sweet spot is slight, even contact when you rotate the drum by hand, then a final check after the wheels are on.
Many self-adjusters work only after proper setup. They are not magic. If you install the parts with the adjuster backed off too far, the pedal may take too long to firm up. Follow the service procedure for your vehicle, then test at low speed in a safe spot. Listen for scraping. Smell for overheating. After a short drive, compare rear wheel heat side to side without touching hot parts directly.
Prevention is mostly small habits. Wash road salt from the wheel area during winter. Use the parking brake often enough to keep the cable moving, but avoid leaving it set for long storage in damp weather when wheel chocks are a safer choice. During tire rotations, glance at the rear drums and hub faces. A few minutes of cleaning can prevent the next brake drum removal from becoming a Saturday you remember for the wrong reason.
A careful road test should feel uneventful. Start with gentle stops in a quiet area, then a few firmer stops once the pedal feels steady. If the car pulls, the pedal sinks, the rear end grabs, or one wheel smells hot, return to the inspection. A repair is not finished when the tools are put away. It is finished when the car stops straight and repeats that behavior.
Conclusion
A frozen rear drum is not a sign that the whole brake system has failed. It is a signal to slow down and read the clues. Rust at the hub, shoe drag, a worn inner ridge, tired springs, and a sticky parking brake cable all leave different hints. A seized brake drum becomes manageable when you stop treating it like a strength contest and start treating it like a locked mechanism. Set the vehicle safely, retract the shoes, break the rust bond with controlled force, and inspect every part before reuse. The smartest repair may be a new drum, shoes, springs, adjuster kit, and wheel cylinder check on both sides, not because replacing more parts sounds impressive, but because rear brakes depend on balance. Do the job once, do it clean, and test it before normal driving. Your next stop should feel boring. That is the whole point.
Frequently Asked Questions
How do I know whether rust or the brake shoes are holding the drum?
Rust usually locks the drum at the center hub, so it will not move much at all. Shoe drag often lets the drum rotate slightly but stops it from sliding off. Back off the adjuster first, then tap around the hub face to separate the two problems.
Can I drive if one rear drum brake is stuck?
Do not drive with a rear wheel that drags, locks, smokes, smells hot, or refuses to rotate freely. Heat can damage shoes, drums, bearings, tires, and hydraulic parts. Tow the car or repair it where it sits before road use.
What tools help with stuck brake drum removal at home?
Helpful tools include jack stands, wheel chocks, penetrating oil, a wire brush, brake spoon, dead-blow hammer, flashlight, and correct threaded bolts if the drum has removal holes. A repair manual for your model helps with adjuster direction and spring layout.
Should I replace both rear drums at the same time?
Replace both if they are worn near the limit, heat damaged, cracked, or badly scored. If only one is damaged and the other measures well, some owners replace one. For balanced braking, many shops prefer axle-pair service.
Why does my parking brake make the rear drum stick?
The parking brake uses cables and levers to push the rear shoes outward. If a cable corrodes or a lever sticks, the shoes may stay partly applied after release. That causes drag, heat, and a drum that fights removal.
Can I reuse brake shoes after they were stuck inside the drum?
Reuse is risky if the lining is cracked, glazed, oil-soaked, uneven, or overheated. Even decent thickness does not mean the shoe is safe. If the drum got hot or the lining looks damaged, replace the shoes and hardware.
Is brake cleaner enough to fix a dragging rear drum brake?
Brake cleaner removes dust and residue, but it will not repair weak springs, frozen adjusters, leaking wheel cylinders, or sticky parking brake cables. Cleaning helps during service. It is not a fix for failed movement or contaminated friction material.
How tight should rear drum brakes feel after adjustment?
The drum should rotate by hand with light, even contact from the shoes. It should not spin with total freedom, and it should not bind. After adjustment, test slowly, recheck for heat, and confirm the pedal feels steady.